Posts

Showing posts with the label Express commands

Attach or Detach Leader to Text or Block Object using Qlattach and Qldetachset Command.

Image
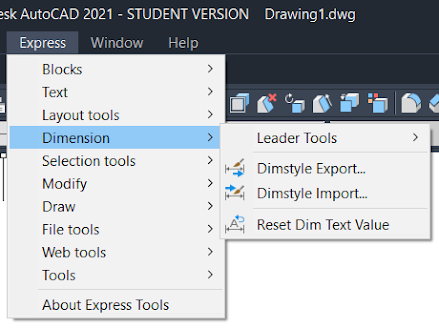
Hello, Friends Today We learn How to use Qlattach and Qldetachset Comamnd. COMMAND : Qlattach SHORT-CUT : Qla MENU : Express > Dimension > Leader Tools > Attach Leader to Annotation - Attaches a leader line to Mtext or Block Object. First Select Leader then Select Mtext or Block Object as Annotation. COMMAND : Qldetachset SHORT-CUT : Qld MENU : Express > Dimension > Leader Tools > Detach Leaders from Annotation - Detaches a leader line to Mtext or Block Object. Select Both Leader Line and Mtext or Block Annotation.   I hope You Like this Post. Subscribe to this blog so you can get regular updates about this blog! If you have any doubt you can comment, we will reply to you as soon as possible. you can share this post with your friends, relative & Colleagues. In the next post, we will learn New AutoCAD Command / Topic. - Bhargav Joshi

How to export & import Dimension Style using Dimex and Dimin Commands?

Image
Hello, Friends Today We learn How to Export Dimension Style using Dimex and Import Dimension Style using Dimin Command.  COMMAND : DIMEX MENU : EXPRESS > DIMENSION > DIMSTYLE EXPORT... - Export Selected Dimension style in .dim (ASCII) file format. Export File Name Specify .dim File Name and Save file path using Browse option. Text Style Options Text Style Name Only : Save Text Style Name only in .dim ASCII File. Full Text Style Information : Save Full Text Style Information in .dim ASCII File. COMMAND : DIMIM MENU : EXPRESS > DIMENSION > DIMSTYLE IMPORT... - Import Dimension style from selected .dim (ASCII) file. Import Filename Specifies the ASCII text file to import. By default, the file has a DIM extension, and the file must be in the format generated by the DIMEX Express Command. Import Options Keep Existing Style :  The Keep the Existing Style option ignores the similarly named style being imported. Overwrite Existing Style :  Overwrite Existing Style uses the simila

Convert Singleline Text into Multiline Text using TXT2MTXT Command in AutoCAD.

Image
Hello, Friends Today We learn TXT2MTXT Command in AutoCAD. We can convert one or more Single line Text objects into Multiline Text (Mtext) Object. COMMAND : TXT2MTXT MENU : EXPRESS > TEXT > CONVERT TEXT TO MTEXT Settings > Combine into a single mtext object Combine Selected single line text objects into single mtext objects. Text ordering - Sort top-down Specifies the order of the selected text by descending vertical position. Text ordering - Select order of text Specifies the order of the selected text by manual selection by Mouseclick. Word-wrap text  Combines all the lines of text into a single line, and then wraps any text that exceeds the width of the mtext object to the next line. Force uniform line spacing Applies consistent interline spacing and paragraph spacing when word wrap is turned on. Paragraph spacing is Half larger than interline spacing. TXT2MTXT COMMAND YouTube Video Link: I hope You Like this Post. Subscribe to this blog so you can get regular updates about

How to use Torient and Tjust Command in AutoCAD Drawing?

Image
Hello, Friends Learn Torient and Tjust Command in AutoCAD Drawing. Command : Torient Short-cut : Tori Menu : Express > Text > Rotate Text - Rotate Selected Text using Absolute Angle or by Two mouse click Points. We can also Rotate Text using most readable option. Options New absolute rotation     :  Enter a new absolute orientation angle for all selected text. We can also rotate text using two mouse click points direction.  Most Readable         : Orients selected text objects to the most readable right-side-up, right-read orientation. Command :  Tjust Short-cut :  Tj Menu :  Express > Text > Justify Text - Change the Justification of Selected Text without moving Text. Torient Command  & Tjust Command Video Link : I hope You Like this Post. Subscribe to this blog so you can get regular updates about this blog! If you have any doubt you can comment, we will reply to you as soon as possible. you can share this post with your friends, relative & Colleagues. In t

How We can use Tcircle Command in AutoCAD Drawing.

Image
 Hello, Today We Learn How to use Tcircle Command in AutoCAD Drawing. We can draw Circle, Slot and Rectangle frame around Selected Text in AutoCAD Drawing. Command :  Tcircle Short-cut :  TCI Menu :  Express > Text > Enclose Text with Object. Enclose Selected Dtext or Mtext Objects using Circle, Slot or Rectangle Object. Circle 's diameter , Size of Rectangle and Slot can be Constant or Variable. Variable Size of Circle, Rectangle or Slot is to be adjusted as per given offset value.  The Constant option encloses selected text and mtext objects with objects that are all the same size, the size of the largest enclosing object. Circle :      Creates circles of constant or variable diameter. Slot:      Creates slots of constant or variable size. A slot is a rectangle with convex sides. For                                         constant-   size slots, you can specify the dimensions that are held constant: width, height,                               or both width and height.

How to use Textmask Command in AutoCAD Drawing?

Image
Hello, Friends Today We learn Textmask Command in AutoCAD. Command : Textmask Menu : Express > Text > Text Mask - Create a mask ( Blanked Space ) behind Selected Text or Mtext Objects. Options Wipeout: Creates a wipeout object with a rectangular frame displayed in the graphics background color. 3dface: Creates a 3D face object. Solid: Creates a 2D solid object in a specified color. Wipeout Masking is done with Blanked Rectangle Area. Masking does not plot properly if the Hide Lines option is used while plotting. One advantage of using a Wipeout mask is that what you see on screen is what you get on your plot. 3Dface The 3Dface created by TEXTMASK has all of its edges set to invisible. This option is useful if you do not have a raster-capable plotter. The Hide Lines option must be used while plotting for the mask effect to work. With this option, masked text does not look masked on screen. Solid With Solid option, masked text appears masked in the drawing area. Also, masks c

How to use Tcount Command in AutoCAD Drawing?

Image
Hello Friends, Today We learn Tcount Command in AutoCAD. Command : Tcount Menu : Express > Text > Automatic Text Numbering - Add Sequential Numbering to Selected Text or Mtext as Prefix, Suffix or Replacement Text.   Select Objects : Select text or Mtext Objects X :    Determines numeric order by increasing x-coordinate values of the selected text. Y :  Determines numeric order by decreasing the y-coordinate value of the selected text. Select-order : Determines numeric order according to the order in which the text was selected. Enter count [Start, increment] <current>: Enter the starting number and increment, separated by a comma, or press Enter Start           Specifies the first number in the sequence. Increment Specifies the difference between the numbers in the sequence. Note : We can also add negative value as increment value. Add minus (-) sign before value. Overwrite              Replaces selected text strings with numbers Prefix              Adds the number

Expand or Shrink Selected Text using Textfit Command in AutoCAD Software?

Image
  Hello, Friends Today We learn about Textfit Command in AutoCAD Software. Command : Textfit Menu : Express > Text > Text Fit - By this Command, We can Expand or Shrink the width of Selected Text object between Start point and End point. This Command doesn't affect the height of Text. We can only select Dtext in this command. For Mtext, first we have to explode text to convert into Dtext. Steps: Select Text to stretch or shrink : Select text Specify end point or [Start point] : S Specify Start point : Specify Start point by mouseclick Specify End point : Specify End point by mouseclick Example: Textfit Command YouTube Video Link: I hope You Like this Post. Subscribe this blog so you can get regular updates about this blog! If you have any doubt you can comment, we will reply to you as soon as possible. you can share this post with your friends, relative & Colleagues. In the next post, we will learn New AutoCAD Command / Topic. - Bhargav Joshi

How to change the Text Case by Tcase Command in AutoCAD Software?

Image
  Hello, Friends Today We learn about How to Change the case of Select text. Command : Tcase Menu : Express > Text > Change Text Case - Change the Case of Selected Text, Mtext ,Attribute & Dimension Text. Sentence Case : In Sentence Case, First Character of Sentence converted into Capital. lowercase : In lowercase, All the characters of sentence converted into small letters. UPPERCASE : In UPPERCASE, All the characters of sentence converted into Capital Letters. Title Case : In Title Case, First Character Each Word of  sentence converted into Capital letters and other character converted into small letters.   tOGGLE cASE : In Toggle Case, Small Letters of Sentence converted into Capital letters and Capital letters are converted into small letters. Tcase Command YouTube Video Link: I hope You Like this Post. Subscribe this blog so you can get regular updates about this blog! If you have any doubt you can comment, we will reply to you as soon as possible. you can share thi

Write Text Along an Arc Object in AutoCAD Software.

Image
  Hello, Friends  Today We learn about ARCTEXT Command. Command : Arctext Menu : Express > Text > Arc-Aligned Text - We can write Text along an Arc using Arctext Command in AutoCAD Software. When We Select any Arc after applying Arctext Command. Following Arc options window is appear. Reverse Text Reading Order : Order of the Selected Arc- Aligned Text is Reversed. Alignment : Change the Alignment of Selected Arc : Left , Right, Center , Fit Position : Controls the Position of Arc- Aligned Text either Convex Side or Concave Side. Direction : Specify Direction of Arc-Aligned Text either outward from center or Inward to the center. Typeface : We can Apply Bold, Italic and Underline to selected Arc-Aligned Text. Color : We can change Color of Selected Arc-Aligned Text. Style : We can apply Text Style to Arc-Aligned Text. Font : Directly change the font of selected Arc-Aligned Text. Properties       Text Height : Change the Height of Arc-Aligned Text.      Width Factor : Chang

How to select objects quickly using FS Command?

Image
  Hello,Friends Today We learn about FS Command. Command : FS Menu : Express > Selection Tools > Fast Select - Quickly Select all the objects which touch the selected object. We can select Line, Polyline, Arc, Circle, Ellipse, Text, Mtext, Image in FS Command. FSMODE system variable Controls the FS command. If FSMODE is off, We can only select touching object of selected object. If FSMODE is on, We can select touching object of selected object as well as other objects which are touching to those objects. FS Command YouTube Video Link:  https://youtu.be/CaT0IeXP9Fg I hope You Like this Post. Subscribe this blog so you can get regular updates about this blog! If you have any doubt you can comment, we will reply to you as soon as possible.you can share this post with your friends, relative & Colleagues. In the next post, we will learn New AutoCAD Command / Topic. - Bhargav Joshi

Exoffset Command in AutoCAD Software

Image
Hello, Friends Today We learn about Exoffset Command in AutoCAD Software. Command: Exoffset Menu : Express > Modify > Extended Offset - Exoffset is the same as Offset Command with other advance options. Distance(d) : Offset Selected objects with Specify Offset Distance. Through(t) : Offset Selected objects with specific point by a mouseclick. Gaptype(g) : Offset selected objects to create extended, Filleted & Chamfered corners with fill gaps in a polyline. Use offsetgaptype variable to set the option.           offsetgaptype                Value                                             Description                    0    :  Offset selected object in extended fill gaps in a polyline.                    1     :   Offset selected object in filleted segments, Radius is the same as offset distance.                    2      :   Offset selected object in chamfered segments, chamfer distance is the same as offset distance. Multiple(m) : Create multiple offset copies of the selec

How to use MOCORO Command in AutoCAD Software?

Image
  Hello, Friends Today We learn about MOCORO Command.It is combination of Move,Copy, Rotate & Scale Command. Command : MOCORO Menu : Express > Modify > Move/Copy/Scale In Single Command, We can Move, Copy, Rotate & Scale Selected object. Move(m) : Move Selected Object. Copy(c) : Create Multiple Copies of Selected object. Rotate(r) : Rotate Selected Object. Scale(s) :  Scale or Resize Selected Object. Base(b) : Specify New basepoint for selected object. Mocoro command YouTube Video Link:  https://youtu.be/LxqaO8__6yw I hope You Like this Post. Subscribe this blog so you can get regular updates about this blog! If you have any doubt you can comment, we will reply to you as soon as possible.you can share this post with your friends, relative & Colleagues. In the next post, we will learn New AutoCAD Command / Topic. - Bhargav Joshi