How to Apply Hatch in objects in AutoCAD Drawing?
Hello, Friends
Today We learn How to Apply Hatch Patterns in AutoCAD Drawing.
Command : Hatch
Short-cut : H
Menu : Draw > Hatch
Apply Hatch Patterns or Solid Fill in Internal Boundary of Object or in Selected Objects.
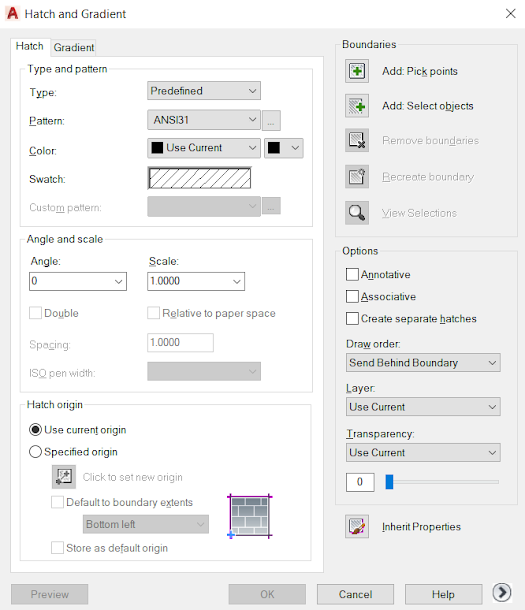
Patterns
Apply Different Types of Patterns from ANSI ( American National Standard Institute), ISO
(International Standardization Organization) ,Other Predefined or Custom (.pat) options.
Color
Select Hatch Pattern Color and Background Fill color for Hatch Pattern.
Swatch
Show the Thumbnail of Selected Hatch Pattern.
Boundaries
Add : Pick Points
Mouseclick in internal Part of Object to Apply Hatch in Particular Region of Object.
Add : Select Objects
Select Objects to apply Hatch in Selected Objects in AutoCAD Drawing.

Angle : Rotate Hatch Pattern with Specified Rotation Angle. Select Rotation Angle from List or We can type own Rotation Angle. Default Angle = 0.
Scale : We can Select Hatch Pattern Scale from List or We can Type own Scale Factor.
Default Scale Factor = 1.0

If We Hatch is Associative then, Hatch Pattern is updated when We Modify Boundary Objects.
Annotative
If Hatch Pattern is Annotative then Hatch Pattern Scale is changed with Annotation Scale.
Separate Hatches
This Option Control Whether the Single Hatch Created or Multiple Separated Hatches Created in Boundary Objects.

Transparency
This Option Control Whether the Single Hatch Created or Multiple Separated Hatches Created in Boundary Objects.

Set the Transparency Level for Hatch Patterns or Solid Fills. We can set Value between 0-90. To see the transparency TPY Button on Status Bar Should be ON.
Remove Boundaries
Remove Objects from Boundary Definitions.
 Layer
Layer

Assign Specific Layer to Hatch Pattern or Solid Fill from List.
Inherit Properties
Apply Hatch Pattern or Solid Fills of one Object's to Another Objects. By this option, We can use Same Color, Background Color, Angle, Scale of Hatch Pattern apply to Another Objects.
Draw Order
Assigns a draw order to a hatch or fill. You can place a hatch or fill behind all other objects, in front of all other objects, behind the hatch boundary, or in front of the hatch boundary.
Recreate Boundaries
Create a Region or Polyline Object type with Associative Option.
Hatch Origin ( Set Origin)
We can change orientation of Hatch Pattern using set Origin Option.
Gap Tolerance
Sets the maximum size of gaps that can be ignored when objects are used as a hatch boundary. The default value, 0, specifies that the objects must enclose the area with no gaps.
We can Set Value between 0 to 5000.

Island Display Style
1) Outer
Hatch Pattern or Solid Fill Applies only in inward side from Outer Boundary of Island. There is no effect on all internal boundaries of Island.
2) Normal
Hatch Pattern or Solid Fill applies inward side from Outer Boundary. Hatch Pattern or Solid Fill applies alternate Internal Boundaries of Island.
3) Ignore
Hatch Pattern or Solid Fill applies inward side from outer Boundary. Hatch Pattern or Solid fill applies in all internal boundaries of island ignoring the internal boundaries.

Boundary Retention
a)Retain Boundaries
Create a New Object for Hatch Pattern or Solid Fill.
b)Object Type
Select whether the New object created using Polyline or Region Object Type.
Boundary Set
Defines the set of objects analyzed when defining a boundary from a specified point. The selected boundary set has no effect when you use Select Objects to define a boundary.
Defines the boundary set from all objects within the extents of the current viewport.
Existing Set
Defines the boundary set from the objects selected with the New option.
New
Specifies a limited set of objects for evaluation by the pick point when creating the hatch.
Specifies a limited set of objects for evaluation by the pick point when creating the hatch.
Use Current Origin
Uses the current hatch origin setting.
Use Source Hatch Origin
Uses the hatch origin of the source hatch.
Uses the hatch origin of the source hatch.
Use "Hatchedit" Command ( Short-cut : HE ) to Edit Patterns , Color, Background Color, Angle
and Scale of Current Selected Hatch Pattern.
Hatch Command Video Link :
I hope You Like this Post. Subscribe to this blog so you can get regular updates about this blog! If you have any doubt you can comment, we will reply to you as soon as possible. you can share this post with your friends, relative & Colleagues.
In the next post, we will learn New AutoCAD Command / Topic.
- Bhargav Joshi


Comments
Post a Comment
More Information Contact US on email.